 Applied Energistics 2
Terminals
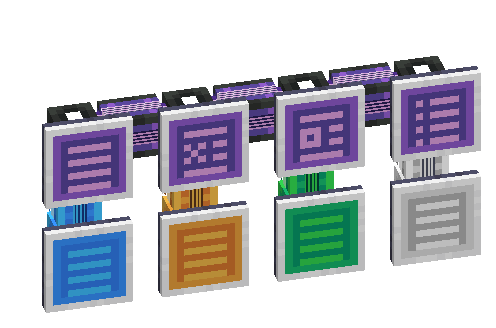
While ME Pattern Providers, ME Import Buses, ME Storage Buses, et cetera are the primary method by which an AE2 network interacts with the world, Terminals are the primary method by which an AE2 network interacts with you. There are several variants with differing functions.
Terminals will inherit the color of the cable they are mounted on.
They are cable subparts.
Terminal Placement
As a terminal is often the first subpart someone might place, it is common to get it wrong and place the terminal backwards. Here is an example of what to do and what not to do:
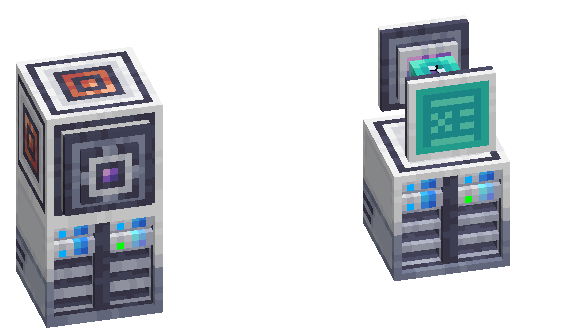
You still have a terminal and an energy acceptor, except now the terminal is the right way around and actually connected to the network, and it all fits in a smaller space too.
Terminal Search
The terminal search box accepts regular expression (regex) terms. For example, you can write "gtceu:.*ore" to get all ores from GregTech. Learning regular expression syntax is left as an exercise for the reader.
Terminal

Your basic terminal, allowing you to view and access the contents of your network's storage and request things from your autocrafting setup.
The UI
There are several sections of a basic terminal's UI
The center section gives access to your network's storage. You can put things in and take things out. There are several mouse/key shortcuts:
- Left-click grabs a stack. Right-click grabs half a stack.
-
If an item or fluid or etc. is able to be autocrafted,
whatever you have bound to "pick block" (usually middle-click) brings up a UI to specify the amount to be crafted. You can also input formulas like
3*64/2, or type=32to only craft the number of items needed to reach 32 in your storage. - Holding shift will freeze the displayed items in-place, stopping them from re-organizing themselves when quantities change or new items enter the system.
- Right-clicking with a bucket or other fluid container will deposit the fluid.
- Left-clicking a fluid with an empty hand will withdraw a bucket of the fluid, if the network has an empty bucket in storage. Left-clicking a fluid with a fluid container will withdraw the fluid into the container.
The left section has settings buttons to:
- Sort by different attributes like name, mod, and quantity
- Filter the view to stored, craftable, or both
- Filter the view to items, fluids, or both
- Change the sort order
- Open the detailed terminal settings window
- Change the height of the terminal UI
On the right, there are slots for View Cells.
The top-right of the center section (hammer button) brings up the autocrafting status UI, allowing you to see the progress of your autocrafts and what each crafting CPU is doing.
Recipe
 Crafting (Shapeless)




Crafting Terminal

The Crafting Terminal is similar to a regular terminal, with all the same settings and sections, but with an added crafting grid that will be automatically refilled from network storage. Be careful when shift-clicking the output!
You should upgrade your terminal into a crafting terminal ASAP.
The UI
The crafting terminal has the same UI as the regular terminal, but with an added crafting grid in the middle.
There are 2 additional buttons for emptying the crafting grid into network storage or your inventory.
Recipe
Crafting (Shapeless)

Pattern Encoding Terminal

The Pattern Encoding Terminal is similar to a regular terminal, with all the same settings and sections, but with an added pattern encoding interface. It looks similar to a crafting terminal's UI, but this crafting grid doesn't actually perform crafts.
You should have one of these in addition to a crafting terminal.
The UI
The pattern encoding terminal has the same UI as the regular terminal, but with an added pattern encoding interface.
The pattern encoding interface has several sections:
A slot to insert Blank Patterns.
A big arrow to encode the pattern.
A slot for encoded patterns. To edit an existing pattern, place the pattern into this slot. You can click the "encode" arrow to overwrite with new data.
4 tabs on the right will choose the type of pattern:
- Crafting
- Processing
- Smithing
- Stonecutting
The central UI changes depending on the type of pattern to be encoded:
-
In crafting mode:
- Left-click in or drag from JEI/REI the ingredients to form the recipe. Right-click to remove the ingredient.
- Enabling substitutions allows things like crafting sticks from any plank type. This should only be used when absolutely necessary.
- Fluid substitutions allows using stored fluids in place of buckets of fluids.
- You can also directly encode a pattern from the JEI/REI recipe screen.
-
In processing mode:
- Left-click or right-click in or drag from JEI/REI the ingredients to specify the inputs and outputs of the recipe.
- Right-click with a fluid container (like a bucket or fluid tank) to set that fluid as an ingredient instead of the bucket or tank item.
- When holding a stack, left-click places the whole stack, right-click places one item. Left-click on an existing ingredient stack to remove the whole stack and right-click to decrement the stack by 1. Using the key/button you have bound to "Pick Block" (usually middle-click) lets you specify a precise amount of the item or fluid.
- The output slots have a primary output and space for any secondary outputs you might want the autocrafting algorithm to know about.
- Both input and output slots scroll, so you can have 81 different ingredients and 26 secondary outputs.
- You can also directly encode a pattern from the JEI/REI recipe screen.
-
The smithing and stonecutting mode UIs work similarly to a smithing table and stonecutter, respectively.
Recipe
Crafting (Shapeless)

Pattern Access Terminal

The pattern access terminal allows access to all pattern providers on the network. This serves to solve a specific issue: in a dense tower of ME Pattern Providers and Molecular Assemblers, you can't physically access the providers to insert new patterns. Additionally, perhaps you're lazy and don't want to walk across your base to insert or update a pattern.
The UI
This terminal has a different UI to all the other terminals.
It has settings for terminal height and which pattern providers to show.
Each row in the terminal corresponds to a specific pattern provider.
Pattern providers in the terminal are sorted and grouped by which blocks they are connected to, or what name you have given them (using a Inscriber Name Press or an anvil).
Recipe
Crafting (Shapeless)